Painting can get pretty expensive. It doesn’t matter if you’re painting the inside or outside of your home; buying the materials can leave you feeling like you’re breaking the bank.
That is especially true right now, with inflation being up across the globe.
People attempt home improvement projects for different reasons. However, the item that usually comes up more than others is saving money. Is that where you land?
If that’s the case, you should look for more ways to save. For instance, today’s question is, “Can you reuse paint rollers?”. Yes, you can reuse these items.
So, before running out and purchasing what seems like a million new rollers during your next house painting project, learn the steps you need to take to reuse rollers.
They can be rollers you recently bought and only used once or those old rollers that have been run through the mill out in the garage.
Do you want to see if you can get some more life out of them? That might be possible.
Hence, stick around and read on to see what the next section holds in store.
Can You Use The Same Paint Roller Twice?
Who hasn’t asked, “Can you use the same paint roller twice?”.
For instance, maybe you started painting your living room, only for an issue to arise after running the roller across a spot once and having to leave.
It would certainly be a waste if you couldn’t reuse the roller. You’d have to buy another sleeve and toss that one, flushing your hard-earned money down the drain.
Or, let’s say you paint the siding on one exterior wall of your house. Sure, you could replace the roller sleeve the next day when you start painting again, but why would you if you didn’t have to?
Whatever your reasons are for wanting to use a paint roller twice, know this. It can be done, but you’ll have to do some things to ensure the part is reusable.
And who knows? You may even get more than two uses out of it.
How To Wash And Store A Paint Roller To Reuse Later
Step 1: Remove Excess Paint
The first thing you need to do when you’re done painting and ready to clean your roller is to run it up and down or side to side on a suitable surface, like a wall or ceiling you will be painting but haven’t done so yet.
This will remove excess paint from the roller, making cleaning easier.
Step 2: Clear Paint From The Roller
The cleaning method you use will depend on the type of paint. Those who paint with latex paint will use soapy water.
Meanwhile, if oil-based paint was part of the equation, you’ll need paint thinner to remove it from the roller. So, if you used latex paint:
- Firstly, fill a bucket with soapy water. Once you have that done, it is time to submerge the roller and allow it to soak for a few minutes.
- Next, pick up the roller with one hand and use the other to squeeze excess paint from the roller.
- After a few times of this, you will dump the water, refill the bucket with clean water, and repeat the process. You’ll want to continue this step until the water you’re left with in the end is almost clear.
If you use oil-based paint, you will also need a bucket of water. However, a paint tray with paint thinner will be necessary first.
Before using paint thinner, always take the time to protect yourself. Wear gloves to prevent the chemical from getting on your hands and burning the skin.
Also, it’s not a bad idea to wear safety goggles or glasses because a splash could always get in one’s eye, causing vision problems.
And what about a mask? Paint thinner fumes tend to be pretty strong. They can cause people to feel nauseous or even get sick if they aren’t careful. Therefore, you might want to wear a mask or respirator too.
Once your protective equipment is in place,
- Pour some paint thinner into a paint rolling tray.
- Be sure to roll the roller around in the substance two to three times or more.
- Then, after the sleeve is just about clean, stick it inside a bucket of warm soapy water.
- Take the roller out after it’s fully submerged, and ring it out with your glove-covered hand. Do this until there’s no paint left, and it’s time to move on to the next step.
Step 3: Dry The Paint Rolling Sleeve
Even if you’re in a hurry, it’s important not to skip steps. The roller must be allowed to dry completely before it is stored away.
That will help the nap outside the roller remain fluffy and intact.
You shouldn’t dry the sleeve just any old way, though. For example, if you set it on a rack, counter, or shelf and leave it to dry, that could cause one side of the roller to flatten.
After that happens, the next time you go to paint, the nap may paint unevenly.
So, stand your roller on end to let it dry. Just be careful and keep an eye on things. You’ll want to be sure it doesn’t fall over and present you with the above problem.
Don’t fret if you do not want to do it that way. I have another solution. Get a clothes hanger and snip off one end.
The sleeve can now be slid over the end of it and hung to dry. Put the hanger and roller anywhere you wish to dry.
If it’s rainy or looks like it might rain, how about hanging the device on a shower curtain rod or bathroom towel rack?
Of course, if it’s nice outside, you can hang the piece on a balcony railing, clothesline, or elsewhere.
Even a garage, shed, or basement can serve in a pinch. Ensure the roller is given an ample amount of time to dry.
After you can no longer feel the moisture on or in the nap, move on to the last step.
Step 4: Store The Dried Paint Roller
Lastly, if you have a resealable plastic bag big enough, place the roller inside it, push out the air, and close the zipper. That will prevent the nap from getting dirty while it isn’t in use.
But don’t worry if you do not have the right size resealable bag. Rather, put your rolling sleeve inside a plastic grocery bag and tie the end.
Set the bag with the roller somewhere so that you won’t have any trouble finding it later. Then, when you’re ready to paint again, it will be right where you left it and ready to go.
How Do You Make Old Paint Rollers Reusable?
Bringing a paint roller that was used a while ago back to life can be challenging. However, it can be done on occasion.
Therefore, I’m sharing these tips to help you accomplish the feat. Thus, please, stick around and read on if your interest is piqued.
Method 1: White Vinegar

People claim that this technique works with brushes and rollers.
Pour enough white vinegar into the bottom of a saucepan so that the bristles of the brush or nap of the roller can soak.
You should leave the pieces in the liquid soaking for around an hour or so. Then, place the pan on your stove and turn on the heat.
Once the roller/brush has simmered for a bit, the nap or bristles should be returned to their original condition.
Finally, rinse the brush or roller with water, allow it to dry, and it will be good as new for the next house painting venture.
Method 2: Washing Machine
This is more of a do-it-at-your-own-risk solution, as there’s always a chance it could mess up your washing machine. However, as long as you’re willing to take that risk, here you go.
Instead of using elbow grease to remove that stubborn paint, let the washer and its agitator do the work for you.
It is a good idea to soak the roller beforehand in hot soapy water or paint thinner. The hope is that it will loosen and remove debris.
After the sleeve has soaked for 30-minutes to an hour, place it inside your washing machine with a handful of old rags or towels.
They will serve as buffers, too, hopefully preventing the sleeve from banging into the drum or getting stuck somewhere it shouldn’t.
Once the cycle has finished, you will need to allow the roller to dry, but don’t put it in the dryer. Instead, cut the end off a clothes hanger, slide the roller on, and hang it in a safe location to dry.
The rags can go in the dryer if you wish, or you can hang them to air dry too. After everything is dry, fold the rags, and put them away.
Now, the sleeve should work as well as new, so you can paint. Or, simply place the roller in a bag to keep it clean until you’re ready to use it again.
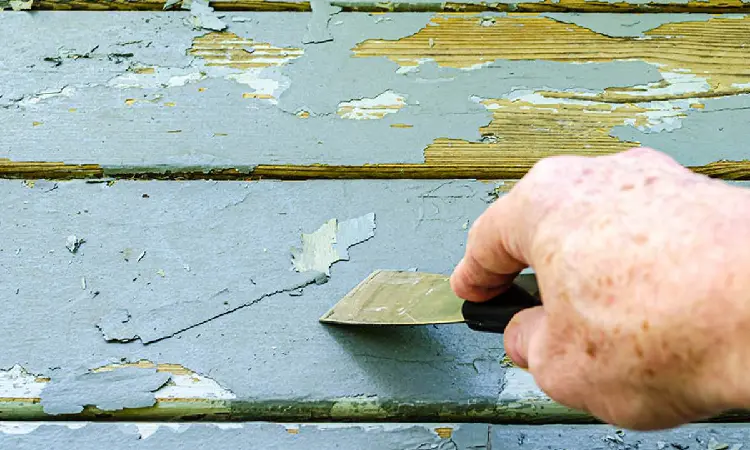
Method 3: A Putty Knife

Are there dried bits of paint and maybe some texture on the roller or rollers you want to salvage?
If that’s the case, don’t be afraid to pull out the big guns to remove them. Of course, by big guns, I mean a putty knife.
Use the tool to scrape away dried debris.
Once you’ve gotten all of the big chunks gone, you’ll need to soak the sleeve in water or paint thinner, depending on whether latex or oil-based paint was used with it last.
Keep the sleeve soaking for 30-minutes to an hour. Then, it’s time to rinse the unit. Squeeze the nap with your hand to ring it out and eliminate excess paint.
When the water is clear and no longer the color of the paint, everything should be good.
Now, the roller will need to dry. Slide it on a dowel to prevent it from falling. Or, if you’d rather, you can use the clothes hanger method I discussed earlier.
Cut one end of a hanger off so the sleeve will slide onto the bottom. Afterward, you can easily hang the device just about anywhere to let it dry.
Finally, put the roller inside a resealable plastic bag and close the zipper. Put it in an easily accessible location, and it will be ready to use for your next project.
An Easy Way To Reuse A Paint Roller The Next Day
Okay, so you painted with a new roller all day. Now, you don’t feel like cleaning it, especially when you’re only going to dirty it up again the following afternoon.
Well, maybe you don’t have to. Did you know it may be possible to leave your roller as-is and still paint with it tomorrow? It’s true. The trick is to ensure the paint doesn’t harden.
All you have to do to make that happen is cover the roller in plastic wrap and store it in the refrigerator overnight.
Of course, place it somewhere out of the way and where it won’t contaminate any foods. You won’t merely be able to unwrap it and begin painting right away.
The roller first needs to warm to room temperature. So, a little bit before you’re ready to paint, get the sleeve, still wrapped in plastic, out of the fridge.
Set it in a paint roller pan and allow it to thaw. After that, you’ll be ready to begin rolling walls, ceilings, or whatever.
Frequently Asked Questions
1. How Long Can You Leave A Wet Paint Roller?
Typically, all is good when people start home improvement painting projects. However, by the time the end of the first day rolls around, some individuals regret the decision.
They’re hot, tired, and don’t want to clean anything. They ask, “Can’t I just do it tomorrow?”.
With precautions, a painter can wait until the next day to clean his or her roller. The only requirement is that they don’t allow the paint to dry.
So, follow the above steps to wrap the roller in plastic wrap and place it in the refrigerator. After a good night’s sleep, pull the roller out of the fridge.
You can let it warm to room temperature if you like. That may make it easier to remove the paint from the nap.
2. Can You Keep A Paint Roller From Drying Out Overnight?
Yes, you can keep a paint roller from drying out overnight. One option is to wrap it in plastic wrap and keep it in the refrigerator, as just discussed.
That’s not all, though. Aluminum foil might be the solution you seek. Put the foil on the tarp or painter’s plastic you probably have laid out somewhere.
Next, place the roller on top of the foil. Wrap the foil around the roller, and be sure to get it nice and tight.
Now, you can place the roller in the fridge, as with the plastic wrap method. Then again, if it isn’t supposed to be very hot and humid, you may be able to store the foil-covered sleeve in the garage for a night.
The foil keeps moisture in and airs out, providing there’s a good seal. So, it should be easy enough to get the wet paint off the next day.
3. Can I Wash Paint Rollers In The Sink?
Homeowners can wash paint rollers in their bathroom or kitchen sinks. But before you decide to do so, it is a good idea to check with your utility department to ensure that it’s legal where you live.
Additionally, you can rinse your paint rollers outside with a water hose.
However, when doing so, ensure that you are nowhere near a groundwater source.
The last thing you’ll want is to be the cause of it getting contaminated. That could impact you, your neighbors, and the local wildlife.
4. Can You Leave Paint Rollers in Water Overnight?
You can leave a paint roller submerged in water overnight. That will prevent the paint from drying and sticking to the nap.
If you’re painting the next day, you’ll want to have another sleeve on hand. That’s because rollers need to be dry before people use them to apply paint.
When individuals try to paint with wet rollers, they do not get the results they were hoping for. Instead, runny paint streaks run down surfaces.
So, you can leave a roller in water overnight and clean it tomorrow, but come prepared with a new sleeve in hand, so your job doesn’t get delayed.
5. Is it Best To Clean Brushes And Rollers Immediately?
You can clean and reuse paint brushes/rollers. I’ve been talking about it here for what feels like ages now.
However, if you can tackle the cleaning process immediately after painting, you might be better off.
When the paint is wet and fresh, that’s when it is the easiest to remove from a nap or bristles.
So, cleaning can wait, providing that you take certain measures and the paint doesn’t harden.
That doesn’t necessarily mean that’s your best option, though. Hence, choose wisely and get your rollers looking and functioning like brand new. However, you see fit.
6. How Do You Stop A Roller From Drying Out Quickly While You’re Using it?
Okay, so this frequently asked question doesn’t have much to do with a roller being reusable later. However, if the paint dries too quickly, that can be problematic.
Can you even imagine? You put the roller down for about 15-minutes, only to return to find it crunchy with dried paint.
You might be able to use it, but if you do, don’t be surprised if the sleeve leaves bits and pieces on your wall, which is supposed to be smooth.
So, instead of worrying about all that, put a thick layer of paint on the roller the next time you’ll be away for five to ten minutes or more.
That should ensure the roller doesn’t get ruined, and you’ll be able to make it reusable after cleaning it later.
Some Final Thoughts
Now that you know you can reuse paint rollers and save some money, why on Earth would you do anything else?
Buy new sleeves as necessary, but clean and salvage before it gets to that point. You’ll be happy that you did when everything is done and you still have some cash in your pocket.